
Once you've acquired or generated ssl certificate for your site, the next thing to do, is to install it on your server. Most web hosting companies do offer ssl manager via cPanel, which makes it easy to upload & install ssl certificates.
Here is how to install ssl certificates via cPanel :
==> Sign in to your site cPanel via www.example.com/cpanel
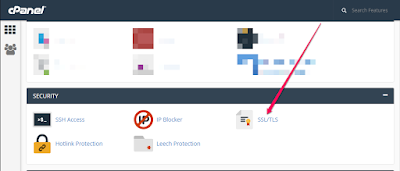
==> Scroll to the 'Security" section and click on "SSL/TLS" as seen in the screenshot below
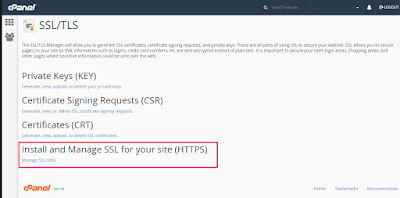
==> Click on ‘Manage SSL Sites’ under "Install and Manage SSL for your website (HTTPS)"
==> Select the domain name you want to enable https for, from the drop down menu
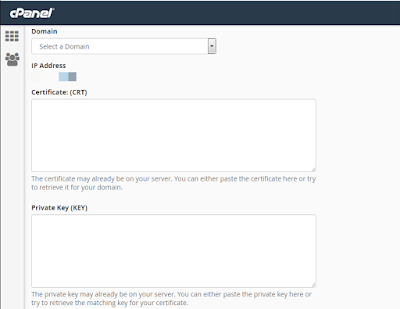
==> Copy the ssl certificate code including —–BEGIN CERTIFICATE—– and —–END CERTIFICATE—– and paste it into the ‘Certificate: (CRT)’ field. Details of the ssl certificate will be displayed.
==> Copy the content of the private key file and paste it into the 'Private Key (KEY)' field.
==> Copy the CA Bundle file into the box under Certificate Authority Bundle (CABUNDLE) box. If you want to use the certificate for Mail Services, tick the checkbox ‘Enable SNI for Mail Services’.
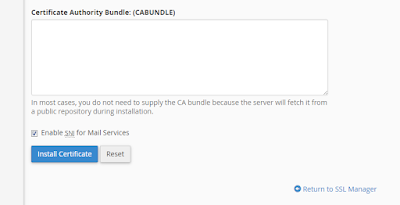
==> Click on the ‘Install Certificate‘ button.
If the ssl certificate is installed, a success message will be displayed.

Thereafter, you should be able to access your site via https://
Test your ssl certificate and do the needful things required after migrating from http to https.
NB: This tutorial also work for installing ssl certificates if Namecheap is your web hosting company.
Here is how to install ssl certificates via cPanel :
==> Sign in to your site cPanel via www.example.com/cpanel
==> Scroll to the 'Security" section and click on "SSL/TLS" as seen in the screenshot below

==> Click on ‘Manage SSL Sites’ under "Install and Manage SSL for your website (HTTPS)"

==> Select the domain name you want to enable https for, from the drop down menu

==> Copy the ssl certificate code including —–BEGIN CERTIFICATE—– and —–END CERTIFICATE—– and paste it into the ‘Certificate: (CRT)’ field. Details of the ssl certificate will be displayed.
==> Copy the content of the private key file and paste it into the 'Private Key (KEY)' field.
==> Copy the CA Bundle file into the box under Certificate Authority Bundle (CABUNDLE) box. If you want to use the certificate for Mail Services, tick the checkbox ‘Enable SNI for Mail Services’.

==> Click on the ‘Install Certificate‘ button.
If the ssl certificate is installed, a success message will be displayed.

Thereafter, you should be able to access your site via https://
Test your ssl certificate and do the needful things required after migrating from http to https.
NB: This tutorial also work for installing ssl certificates if Namecheap is your web hosting company.


Comments
Post a Comment
We Love To Hear From You But Don't Spam Us With Links!
Want to be notified when I reply your comment? Tick the "Notify Me" box.
If your comment is unrelated to this post or you're trying to ask question about an old post, please drop it at our discussion platform here.
THANKS.