
If you would like to secure your Wordpress site with https using letsencrypt free ssl certificate, you can get it done easily if your hosting company supports one-click letsencrypt installation via cPanel. Else, you can consider using the wp-encrypt wordpress plugin.
WP Encrypt is an easy-to-use client for Let’s Encrypt which provides free SSL certificates for everyone. Using the plugin, you can quickly acquire a letsencrypt ssl certificate for your Wordpress site. Once generated, you can install the certificate and switch your site to HTTPS. I've successfully used the plugin for Letsencryt Namecheap integration on some WordPress sites.
And with this plugin you don’t even need to worry about the 90 days expiration of letsencrypt ssl certificates, the plugin will automatically renew the certificates before they expire (as long as you want it to).
Install and activate the WP encrypt plugin.
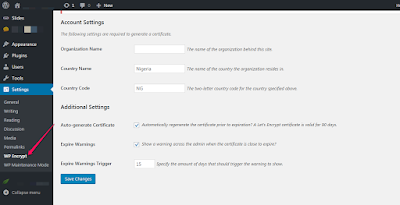
Fill out required info, select the additional settings and click "Save Changes"
If changes are saved successfully, the "register account" button will appear. Click on it.
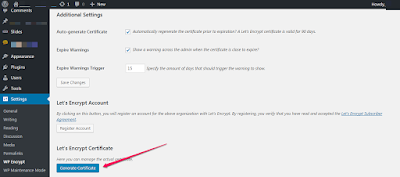
Thereafter, you should see the "Generate Certificate" button. Click on it.
If it generates your letsencrypt certificate successfully, you should see the locations of the certificate and private key as highlighted below:
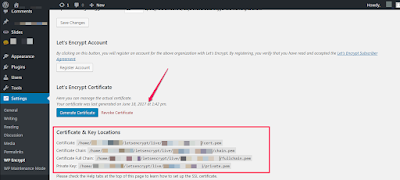
Sign in to your cPanel, navigate to the locations of cert.pem, private.pem and chain.pem files and download them.
Now navigate to "ssl/tls" > “install and manage SSL for your site” in cPanel as explained here.
Use Notepad++ to open the cert.pem, private.pem and chain.pem files.
Copy and paste the content into the Certificate (CRT), Private Key (KEY) and Certificate Authority Bundle (CABUNDLE) fields respectively.
Click "Install Certificate".
If the letsencrypt ssl certificate installs successfully, your site should now be accessible via https://
Install “Really Simple SSL” plugin to configure your website to run over https and test your ssl certificate. If the test result shows that there are mixed content errors, you can use “SSL Insecure Content Fixer” plugin to fix that.
Thereafter, change your site property and view settings url to https in Google Analytics and submit https versions of your site at Google Webmasters. If you've added your sitemap to your Wordpress robots.txt file, update the url of the sitemap to it's https version.
NB : This WP Encrypt plugin requires you to run at least PHP 5.3 on your server. You also need to have the cURL and OpenSSL extensions active. So if this plugin doesn't work for you, ask your hosting provider if your server meets these requirements.
I hope this helps.
WP Encrypt is an easy-to-use client for Let’s Encrypt which provides free SSL certificates for everyone. Using the plugin, you can quickly acquire a letsencrypt ssl certificate for your Wordpress site. Once generated, you can install the certificate and switch your site to HTTPS. I've successfully used the plugin for Letsencryt Namecheap integration on some WordPress sites.
And with this plugin you don’t even need to worry about the 90 days expiration of letsencrypt ssl certificates, the plugin will automatically renew the certificates before they expire (as long as you want it to).
How To Use WP Encrypt Plugin To Set Up WordPress Site for HTTPS
Install and activate the WP encrypt plugin.
Fill out required info, select the additional settings and click "Save Changes"

If changes are saved successfully, the "register account" button will appear. Click on it.

Thereafter, you should see the "Generate Certificate" button. Click on it.
If it generates your letsencrypt certificate successfully, you should see the locations of the certificate and private key as highlighted below:

Sign in to your cPanel, navigate to the locations of cert.pem, private.pem and chain.pem files and download them.
Now navigate to "ssl/tls" > “install and manage SSL for your site” in cPanel as explained here.
Use Notepad++ to open the cert.pem, private.pem and chain.pem files.
Copy and paste the content into the Certificate (CRT), Private Key (KEY) and Certificate Authority Bundle (CABUNDLE) fields respectively.
Click "Install Certificate".
If the letsencrypt ssl certificate installs successfully, your site should now be accessible via https://
What Next?
Install “Really Simple SSL” plugin to configure your website to run over https and test your ssl certificate. If the test result shows that there are mixed content errors, you can use “SSL Insecure Content Fixer” plugin to fix that.
Thereafter, change your site property and view settings url to https in Google Analytics and submit https versions of your site at Google Webmasters. If you've added your sitemap to your Wordpress robots.txt file, update the url of the sitemap to it's https version.
NB : This WP Encrypt plugin requires you to run at least PHP 5.3 on your server. You also need to have the cURL and OpenSSL extensions active. So if this plugin doesn't work for you, ask your hosting provider if your server meets these requirements.
I hope this helps.


Hi Jide,
ReplyDeleteThis is a very useful information. i had been trying to install lets encrypt in my blog but due to the hosting server(hostgator) is not accepting the terms and conditions for the same. i will try to get this plugin and will try to install the SSL cert.
Does it work for hostgator hosting provider as well?
ReplyDeleteTry it bro. It worked with Namecheap, who also doesn't offer support for Letsencrypt ssl certificate. If it doesn't work, you can also try the sslforfree option.
DeleteI tried it on my blog, but broke the site. So, I have to uninstall the plugin to restore my website. I will advise you try this at night when you have less traffic on your website. Thanks BABA JIDE for this info
ReplyDeleteThe blog is www.earnbase.com
DeleteMaybe your server doesn't support it. It's clearly stated above that the plugin requires you to run at least PHP 5.3 on your server. The cURL and OpenSSL extensions must also be active.
Deletewow... i love this post,, drop more bruh...
ReplyDeleteWow, this is extremely awesome, I'll give a try to this asap
ReplyDeleteTechvsEntz
Wonderful Tutorial
ReplyDeleteNice one bro
ReplyDeleteWell explained tutorial..
ReplyDeleteSuccessfully changed my blog to https. Thumbs up boss
Created a wordpress site for a client using whogohost for the host and domain name and the url turned out to be https. Could it be the that the plugin was pre-installed?
ReplyDeleteWhat an amazing article , i will bookmark this page and read it over again when i want to appear on my wp blog gistgallery.com and i hope ipage will allow it
ReplyDelete